Mastering the Split Screen Effect in iMovie: A Beginner’s Guide
Advertisement
Sometimes, you might want to show two videos simultaneously — maybe you're making a reaction video, a comparison, or just want to tell a story from two angles. This is called a split screen, where the screen is divided into two parts, each playing a different video. Once you know where to look, it's pretty easy to do in iMovie. Whether making a school project, a YouTube video, or just having fun, learning this trick will make your videos look much more interesting.
Getting Your Clips Ready for Split Screen
Before creating the split screen effect, you need to organize your clips. First, open iMovie and create a new project by clicking the big "+" sign and choosing "Movie." Then, import the two video clips you want to use. You can do this by dragging and dropping them into your project media area or clicking the "Import Media" button.
After both clips have been imported, drag your primary clip to the timeline. This is where your foundation will be. Then, locate your second clip and drag it on top of the first one in the timeline. You now have two video layers stacked on top of one another. This is crucial because iMovie requires both videos to be stacked in this manner to apply the split screen effect.
Before you move forward, ensure your clips are trimmed and ready to use. If one clip is too long or too short, you can click and drag the edges to trim it to the correct length so that both clips align better. This will ensure the end video is smoother.
Applying the Split Screen Effect
Once you have both clips stacked in the timeline, it's time to apply the split screen effect. Click on the top clip to select it. When you do that, many video editing options will be available above the viewer window. Look for the button that looks like two rectangles side by side—this is the "Video Overlay Setting. Click it.

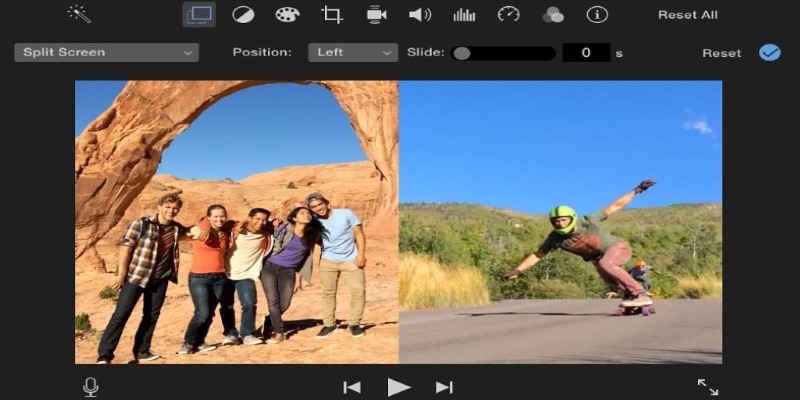
From the dropdown menu, choose "Split Screen." Your two clips will instantly be displayed side by side in the preview window. iMovie automatically splits the screen evenly between the two videos.
After you choose split screen, you’ll get a few more options. You can decide if you want the split to be horizontal or vertical. Horizontal puts one video on top and the other on the bottom, while vertical puts them side by side. For the classic "side-by-side" look, make sure you choose vertical.
You can also adjust where the split happens by dragging the line between the two clips. This is easy to do if you want one clip to have a little more space than the other, and it is a setting that lets you decide whether you want a soft border between the two videos or a hard line. Play around with these options until it looks the way you want.
Adjusting and Fine-Tuning Your Split Screen
After you've set up your split screen, you might notice a few things that need adjusting. Maybe one clip doesn't match the other perfectly. Maybe the audio from both videos is playing simultaneously and sounds messy. These little details can make a big difference, but are easy to fix.
First, think about the sound. If you want only one video's sound to be heard, click the clip you don't want to hear and lower its volume. You can do this by selecting the clip and dragging the volume line down to zero. This way, only the important audio will be in the final video.
If your videos don’t line up right, like if someone is talking in one clip but not in the other, you can trim and move the clips around in the timeline. Click and drag clips to shift their starting points so the action happens at the right time on both sides.
You might also want to add a little transition effect when the split screen first appears. Instead of the videos popping onto the screen, you can make them slide into place or fade in. To do this, apply the transition effects in iMovie at the beginning of the clips. It gives your video a more polished and professional feel without being too complicated.
Another small tweak is color matching. If the lighting looks different between your two clips, it can be distracting. iMovie has a "Color Match" tool to help you make the two clips look more similar. Select your clip, click the color balance button above the viewer, and choose "Match Color." Then click a part of the other clip that looks good. iMovie will automatically adjust the colors to make them match better.
Exporting Your Finished Split Screen Video
Once you're happy with how everything can save your work, once it looks and sounds, you can save your work. First, a few times to ensure everything is lined up and there are no mistakes. Watch for any weird cuts, sound issues, or clips that end too early or late. If you see something that looks off, it's easier to fix it now before you export.

When you're ready, click the little square with the arrow at the top right corner of iMovie — that's the "Share" button. Then, choose "File" to save the video to your computer. A settings box will pop up. Here, you can choose the resolution and quality. For most projects, 1080p with high quality is a good choice. Give your file a name and pick a folder where you want to save it.
Click "Next," then "Save," and iMovie will create your final video. Depending on the video's length and your computer's power, it might take a few minutes. Once done, you'll have a clean, side-by-side split-screen video ready to upload, share, or keep for yourself.
If you plan to upload it to YouTube, Instagram, or another platform, check its video size and format rules first. However, iMovie's default settings are usually good enough for most uses.
Conclusion
Making a split-screen video in iMovie sounds tricky at first, but once you break it down into steps, it's pretty simple. Start by getting clips ready. Use the video overlay settings to create the split-screen effect. Fine-tune everything to look and sound right. It's a fun way to tell two sides of a story simultaneously, and once you learn how, you'll find yourself using this trick all the time in your videos.
Advertisement
Related Articles

Discover Mellum: JetBrains’ New Open-Source AI for Efficient Coding

Top 10 Best Video Editors for Android: A Complete Guide

Simple Ways to Combine WMV Videos Without Losing Quality

Firefox Finally Adds Tab Groups, Solving a Long-Standing User Demand

Simple Ways to Record a Teams Meeting: Built-in and Other Options

Arc Browser Review: Is It Time to Make the Switch?

Top 5 4K Monitors You’ll Love for Gaming, Work, and Beyond

5 Best Xbox Converter Apps and Devices for Mac

Mastering the Split Screen Effect in iMovie: A Beginner’s Guide

Klaviyo vs. Mailchimp: Best Email Marketing App in 2025

How to Make a Creative Instagram Story Using Photo and Video Collages

 novityinfo