 novityinfo
How to Make Your Videos Look Stunning: 3 Simple Ways to Optimize Video Quality
Advertisement
Have you ever recorded a video that looked amazing on your phone, but once you played it back on a computer, it seemed blurry, dark, or not as good? You're not alone. Video quality depends on more than just how expensive your camera is. Lighting, editing, and file settings can make a huge difference. In this article, we'll break down three simple but very effective ways to boost your video quality without needing to be a tech expert. Whether you're recording gameplay, vlogs, or class projects, these tips will help your videos look sharp and professional.
Improve the Original Recording Settings
Before concerning yourself with editing or software, the simplest way to achieve good quality videos is by beginning with disorganized recordings. If it is disorganized, it is more difficult to repair it later and, in some cases, can even deteriorate it. Let's consider a few small adjustments that have a massive impact.
First, look at your resolution settings. Most phones and cameras allow you to select between 1080p, 720p, and 4K. The higher the resolution, the more detail. Always select the highest setting your device will allow if you have the storage capacity for it.
Next, look at your frame rate. Frame rate is how many images your camera captures per second. A video at 60 frames per second (fps) will look much smoother than one at 30 fps, especially if there's a lot of movement. Higher frame rates can make your video much easier to watch if you're recording sports, action scenes, or fast gameplay.
Lighting is another major factor. No matter how good your camera is, your video will look grainy or too dark if your lighting is bad. Natural daylight is one of the best options. Try recording near a window during the daytime. If you're indoors or recording at night, you might want to use a small ring light or even a desk lamp. Make sure the light is facing you, not behind you.
Finally, keep your camera steady. Shaky footage makes videos hard to watch and can hurt the quality. Use a tripod if you have one or place your camera on a flat surface.
Use Professional Video Enhancement Tools
Sometimes, the footage looks imperfect, even when you do everything right during recording. That's where enhancement tools come in. These apps or software programs help polish your video without needing expensive editing knowledge.
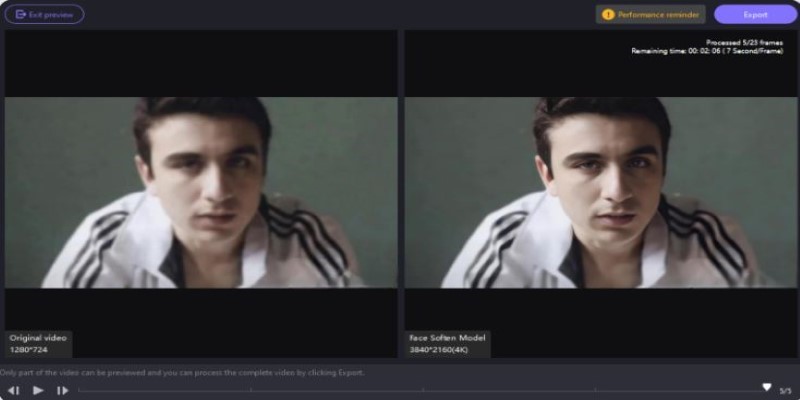
Video enhancers automatically fix common problems like blurriness, noise (tiny moving dots in dark parts of the video), and washed-out colors. Some tools use artificial intelligence (AI) to analyze the video frame by frame and add back missing details, making everything look sharper and more colorful.
For example, HitPaw Video Enhancer and Topaz Video AI are popular apps that many YouTubers and content creators use. You just upload your video, choose a setting like "Upscale to 4K" or "Reduce Noise," and the tool does most of the work for you.
These tools can make a huge difference if your video is a little blurry because of low lighting or a shaky hand. AI-powered tools don't just sharpen the image—they rebuild parts by guessing what the missing details should look like. It's almost like giving your video a mini makeover.
However, remember that while these tools are helpful, they can't perform miracles. If a video is very pixelated or heavily damaged, even the best software can only fix it so much. That's why it's best to use these tools as polish, not as a total rescue mission.
Adjust Compression and Export Settings Carefully
The final step often overlooked is saving or exporting your video after recording or editing it. If you don't pick the right settings, even a great video can lose a lot of quality during this last step.

Compression is when the computer shrinks your video file size to make it easier to upload or store. If a video isn't compressed correctly, it can lose detail, get blurry, or have weird glitches where colors and movement don't look right.
When saving your final video, always choose a high-bitrate export option. Bitrate means how much data is used for each second of video. A higher bitrate keeps more of the original detail, though the file will be bigger. Many editors like Adobe Premiere Pro, Final Cut Pro, or even free tools like DaVinci Resolve let you control the bitrate manually. A bitrate between 10,000 and 20,000 kbps for 1080p videos usually looks great for a good balance.
Pick the right file format, too. MP4 is popular because it maintains good quality while considerably shrinking file size. If you want even better quality and don't mind a bigger file, you can save it in MOV or AVI formats. Just be careful because these can get very large, very fast.
Resolution and frame rate settings during export should match what you recorded. If you recorded in 1080p at 60fps, export at the same settings. Downgrading them will hurt the final look.
Some video editors have an option called “Render at Maximum Depth” or “Use Maximum Render Quality.” Always turn these options on if available. They take longer to export but help protect your video’s details.
Wrapping It Up!
Optimizing video quality isn't as complicated as it sounds. Start with good recording practices like better resolution, frame rates, and lighting. Use professional video enhancers to fix small problems and polish your footage. Finally, focus on compression and export settings so your finished video stays sharp and clear. Putting these steps together makes even a simple home recording look professional. Whether sharing videos with friends or posting them online, these tips help your work look its best. Stay tuned for more!
Advertisement
Related Articles

Simple Ways to Record a Teams Meeting: Built-in and Other Options

Top 10 Best Video Editors for Android: A Complete Guide
Step-by-Step Guide to Rotating a Video File on Your Computer

How to Capture Your Best CSGO Gameplay: A Simple Guide for Players

How to Record Your Gameplay on PC Like a Professional: Essential Tools and Tips for 2025

Best Video Makers for iPhone: Complete List of Top Editing Tools

Snagit vs Camtasia: Choosing the Right Tool for Your Screen Capture and Video Editing Needs
Firefox Finally Adds Tab Groups, Solving a Long-Standing User Demand

Trello vs. Todoist: Which Should You Use in 2025 for Tasks?
How to Convert FLV to MP4 for Free: Top Tools and Easy Methods

Discover How ActiveCampaign Reduced Its Churn Rate to 6% in 90 Days